

Previous chapters:


In the previous chapter we understood how to design a solution and make a time estimation. Now it's time to allocate resources and calculate the cost of the solution.
Estimation Template
Please, find an estimation template here. It allows to write down the work breakdown, estimation, schedule, resource plan and project calculation. Let's go through it step by step.
Estimations
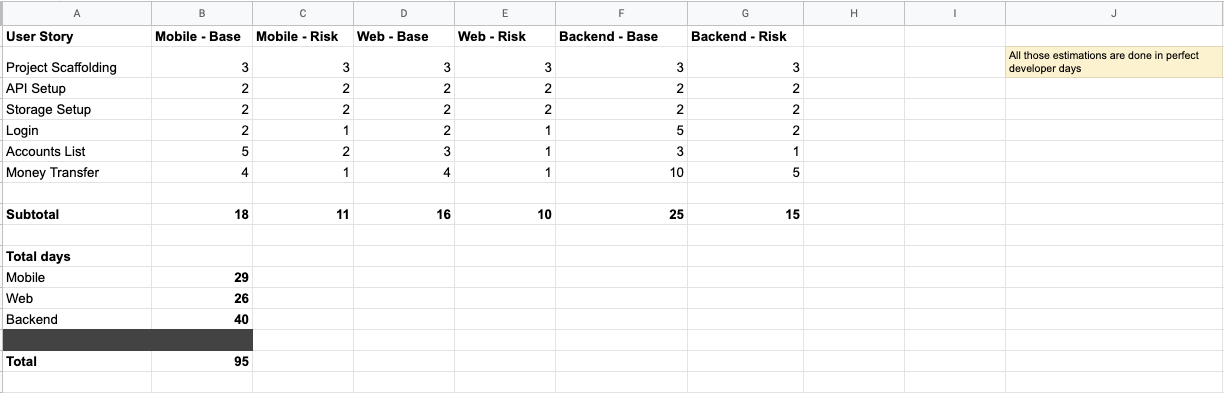
The first tab we have is the 'Estimations' tab. In the first column you need to enumerate all the activities which are required to fulfill during the project. This list includes both technical and business tasks. As you can see in the screenshot, you can have here some project scaffolding activities(like repo setup, access distribution etc.) and the User Stories which you received earlier.
In the columns you will have the components. Mobile, Web, Backend. You can have additional components - all according to your solution. Template assumes you will have 2 estimations per each activity in each component: an idealistic and a risk one.
Templates also summarizes all the estimations in a single number, which describes the perfect developer days required to complete the project.
Multipliers
Writing code is far from being single activity in the project. You need meetings, code reviews, writing unit tests, testing etc. For all of that we have 'Multipliers' tab.
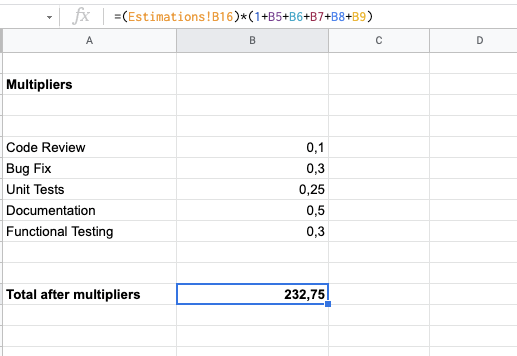
Here we apply the multipliers to the number we had in Tab 1. Feel free to adjust the coefficients or add some new ones.
Rate card
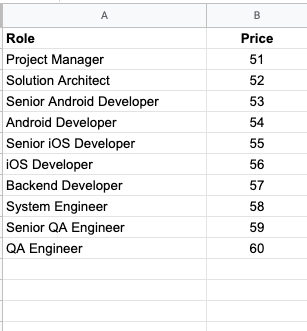
Every person on the project is an expense. Sounds sad, but true. In order to calculate the cost of the project you need to know how much you're paying each role. This is what 'Rate Card' tab is. Here you have a list of required roles and the hourly rate per each role. Adjust the list and numbers accordingly to your company/project.
Resources
When we have the total required time and the hourly rate for each role we can put up the required resources in place.
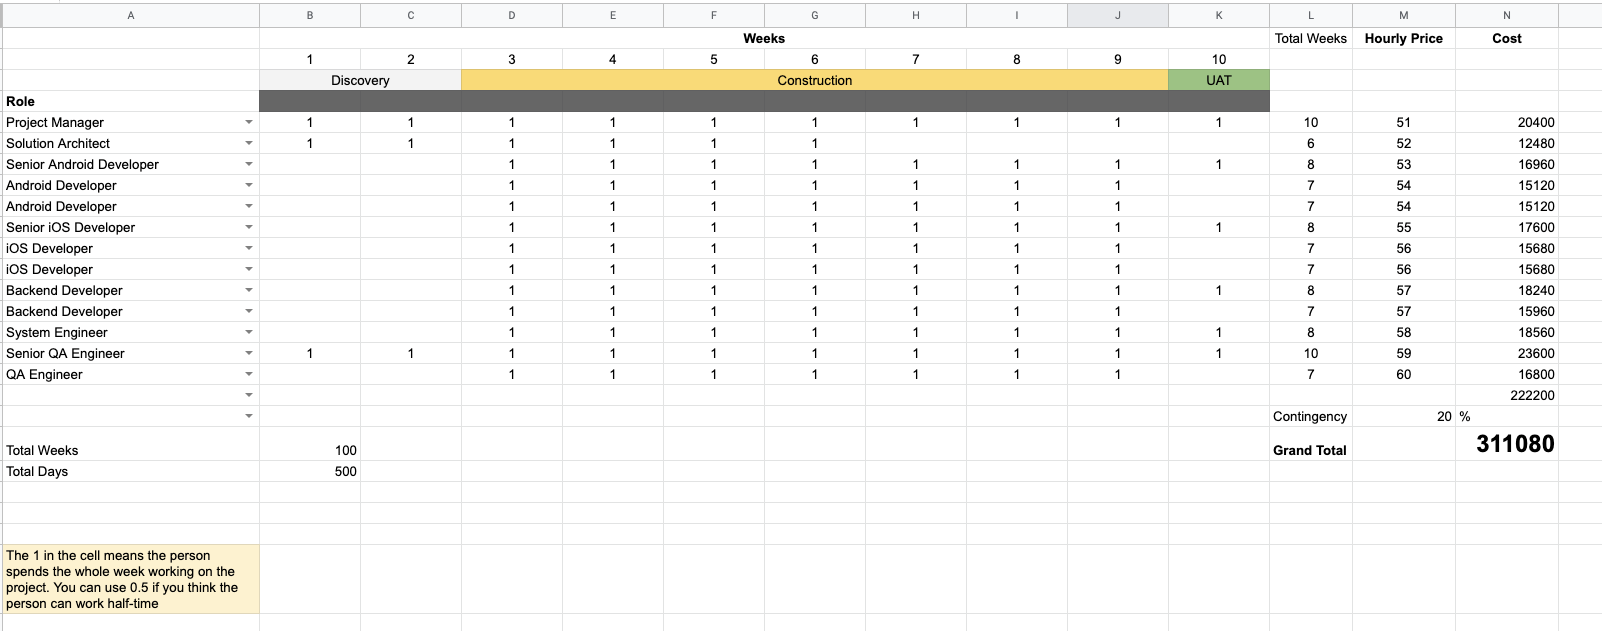
In the column A we have our roles. Obviously, some roles will be repeated, as you may have 3 developers, 2 QA people etc. The template is configured the way that you can only choose a role from the list from the rate card. So, if you're missing any role, feel free to add them there.
Columns B to K are dedicated for the resource allocation. You will require different people on the different stages of the project. Say, you don't need developers on the Discovery stage, however they are crucial during Construction.
You can have more or less columns in this section as every project has it's own timeline. However there are two things which are consistent across the projects.
Discovery is the project stage when you try to better understand the requirements, stakeholders and the technology landscape we are dealing with. At this stage you typically need a Project Manager, a Solution Architect and maybe someone from QA side. Discovery can take from 1 to 4 weeks. This is billable time, so you need to account for it in the resource plan.
Another stage happens when construction completes. It is called User Acceptance Testing(UAT). Of course, you make a lost of testing during construction stage. UAT is more like to ensure that the solution has the necessary quality before launch. This stage includes a lot of final testing, bug fix and general polishing. The development team can be decreased to 1 person per platform.
Now it's time to calculate the cost. In the column N we multiply the total weeks with number of hours per week(40) and the cost from the rate card. The Estimation Template take the number from the Rate Card list automatically. So, we need to just sum the cost of each person.
The last thing you might want to do is add some contingency: in case you made tons of assumptions due to lack of knowledge about the project, you would like to account for this lack. This is shown in the template as well.
Timeline
This is an optional thing, but the customers often want to understand the timeline of the project. You can use Gantt Chart, draw it in the Powerpoint, or create the timeline in the excel tab like in the template. Show which activity happens after which for the transparency.

This is the end of the series! If you have any questions leave a comment down below and will ask them. If you need a personal consultation on the estimating the project or solution architecture I am available for it.
Don't forget to smile alright! 🤩
Also, if you liked the article, don't forget to Subscribe to get notified once a new article is published. Sharing the article in your social networks are always welcome as well.